
Hi, Ladies, welcome to week #2. This week we will be piecing our pinwheel quilt blocks and putting together the quilt top. Both of these are easy to do and you will feel quite accomplished when you reach the end of this lesson.Note: One key to successful quilting is "checking and rechecking". Be sure that you consistently make sure that your blocks are correctly laid out and that your seams are evenly joined.
First of all, here is a picture of my fabric being sewn. I am posting it because I wanted to show you where I find my 1/4-inch mark on the machine. Once you pick your mark, stick with it throughout your quilt:
Your first job is to lay out your pinwheels. If you look closely at the picture, you can see that there are two different ways to lay out your blocks:
Pick one way and stick with it. Notice that when two blocks are laid side-by-side, the background fabric should always meets up with a pinwheel fabric:
Lay out all of your fabrics into pinwheel piles: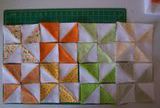
Notice that in each color you have four piles: "2 top piles" and "2 bottom piles". Pick one color to start with and sew all of the "2 top" pieces together and then sew all of the "2 bottom" pieces together, using a 1/4-inch seam: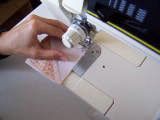
Again, there is no reason to cut your thread between pieces:
You will end up with "kite strings" again: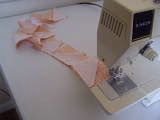
Trim your threads connecting your pieces. Here is a picture of the top piece and the bottom piece ready to be sewn together:
Now you are ready to sew your "top 2" pieces to your "bottom 2" pieces. In order to line them up evenly, match them at the seams, rather than the sides of the fabric:
Lay the two seams in opposite directions (to avoid bulkiness) and sew your 1/4-inch seam. (If this is confusing, try comparing the above picture with the picture below.):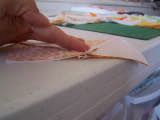
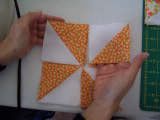
You will end up with a huge pile of pinwheels (40 to be exact):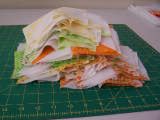
Now, the fun part! Your quilt will have 36 blocks total, 6X6. When you lay out your blocks, you will want to be careful to evenly distribute your colors. If you are using 6 or more colors, no two blocks of the same color should be touching. Also, make sure that your lights and darks are evenly placed throughout the quilt. You don't want to end up with all the lights on one side and the darks on the other. You may want to seek someone's opinion on this: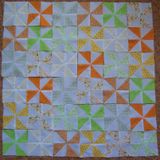
Note: remember to match up your seams rather than the sides of your fabric.
You will notice that your quilt is made up of 6 rows. Beginning with the first row, you will start by sewing the six blocks in each row together ( at the end of this step you will have 6 complete rows). After you have completed that step, you will sew the six rows together. It is a good idea to pin the rows together at each seam. Ease your fabric (lightly stretch it) to make the seams meet, if necessary.
Voila! A finished quilt-top! At this point, remember that, since your squares and blocks were not perfectly square, your quilt top will not be perfect either. On my quilt top, an entire row ended up being about 1/8-inch off--even easing the fabric did not help. This is, unfortunately, a natural part of quilting.
Now, you can take the time to sit back and relax until next week when we will be making a quilt "sandwich" and choosing a method of quilting.
Happy quilting!
Monday, January 30, 2006
Quilt Lesson #2
Subscribe to:
Comment Feed (RSS)


|