Welcome to Quilt Class #1!
Before you start, let me tell you a couple of important things. First, do NOT be afraid over the size of this post! I took pictures of almost every step so the post is HUGE! But rest assured that it is largely because of all the photographs. This week is more time intensive than the weeks to come, so don't get too discouraged if it seems to take a long time. I can assure you that week #2 will be much easier! Second, if you are familiar with a particular step, feel free to move ahead or do it in the way you like best. My techniques are not necessarily the best way to do things, it is just a reflection of how I learned to quilt. Third, please let me know if a particular step is hard to understand or if you need help. I will be checking my comments regularly for this reason. Do NOT feel bad if you need to ask a few questions, I had lots of questions when I first started quilting!
Before you begin to cut your fabric, you need to wash it in warm water and dry it on a normal setting and iron it. If you purchased any specialty fabrics (such as Batiks) you might need to wash it in cold and line dry your fabric.
The first step in cutting your fabric is to make a straight edge on your piece. (This is a very important step--it is a key to cutting straight pieces). A piece of fabric has a finished edge and a raw edge (this is the edge that was cut at the fabric store). In the picture below, the raw edge is facing up towards my chin:
On the raw edge, you need to tear a straight line down the fabric. You do this by cutting a 1/2 to 1 inch slit and then continuing to tear it the length of the raw edge. Sometimes the tear will stop halfway down your fabric and you need to cut another slit and tear until it reaches the bottom of the raw edge.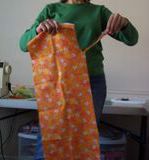
Next you will fold your piece of fabric in half lenghthwise: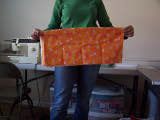
And in half lengnthwise again: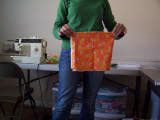
Then you are ready to begin cutting the fabric. Lay the fabric on your mat (the raw edge will be to your left and the length of the fabric will be to your right. Place your quilting ruler over your fabric and measure and cut approximately 1/4 inch of fabric. This will remove the fringe-y edge. Be sure to place enough pressure on the ruler to keep it still and enough pressure on your rotary cutter to cut through all of the layers of fabric.
Now, place your quilting ruler over the fabric and measure and cut a 4-inch wide strip.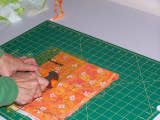
Now, take your 4-inch wide strip and open it up and place it on your cutting mat. Cut a straight edge. (You can do this by lining up the top of the strip with the horizontal marks on your cutting mat and cutting a straight edge according to the diagonal marks.)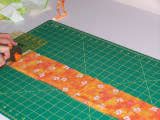
Now, mark and cut a 4-inch square. Continue cutting squares for the length of the strip.
Here is what your squares will look like: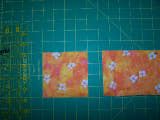
You need to cut all of your background and pinwheel fabric in this same manner until you have 80-background fabrics and 80-pinwheel fabrics. (From your pinwheel fabrics, you need to have an even number of squares from each--totaling 80.) Do not let the numbers scare you, once you get the hang of cutting, it will progress quickly!)
Regarding cutting your strips and squares: you will not be able to get every strip and square perfect so relax and enjoy it. I suggest that after you cut each strip, let it fall open and if it looks fairly straight, continue cutting strips. If the strip looks wavy or crooked, do another tear strip down the edge of your fabric. This is especially important on bigger pieces of fabric that you will cutting numerous strips off of. (On my 1/4-yard pieces, I only cut one strip from each piece, so checking was not necessary. With my background fabric, however, I had to tear three separate times while cutting my strips.)
Now, we get to move on and do something besides cutting.
One each background square, using a sharp pencil and your quilting ruler, draw a straight line on the wrong side of the fabric, from point to point--only from top to bottom. See the picture below:
When you have drawn a line on every background square, you are ready to start sewing. With RIGHT SIDES TOGETHER, place a background piece on top of a pinwheel piece. (Your pencil line will be facing up towards you.)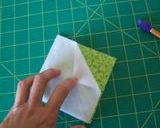
Sew a 1/4-inch seam on each side of the penciled line. I used purple thread for the picture--use matching thread for your pieces! (It is very faint in the picture but the penciled line is between the two purple seams.)
When you are sewing your pieces together, you do not need to cut the thread between each diamond, just continue to feed the diamond into your sewing machine,one after the other, creating a "kite string". If you look closely at the picture, you will notice the thread still connects the diamonds.
When you are finished sewing the 1/4-inch seams on each side of the penciled lines on all of your squares, cut the thread the connects the squares apart. You will end up with a big pile, like this:
Now, using your quilting ruler and rotary cutter, cut each diamond in half on the penciled line.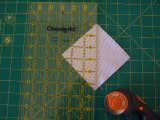
They will look like this:
Now, iron your pieces flat, with the seam towards the printed (or darker) fabric:
You will end up with a bunch of piles, like this:
Cut off the 2 tails that hang off the back of the squares:
You want a nice, clean square, like this one: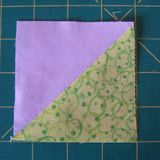
From here you can see how these will become pinwheels: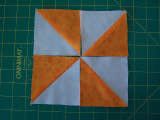
The squares will measure approximately 3-1/2 X 3-1/2 inches. Any measurement close to this will be fine.
Now, sit back and relax! Let me assure you that next week will be a breeze compared with this week! We will sewing the pinwheels together and then sewing the quilt top together.
When you are done, please let me know!
I will post Lesson #2 on Monday, January 30.
Monday, January 23, 2006
Quilt lesson #1
Subscribe to:
Comment Feed (RSS)


|