Note: Before quilting, I added a border to my quilt. Since the border was not included in the picture of the quilt we are making(or the fabric measurements) I made this an optional step. Click here if you want to add a border.
--Added note: Thanks to Deb, I realize that I accidently called the binding fabric "border fabric" on the supply list. So the 1/2-yard of extra pinwheel-colored fabric will be used in Lesson #4. What this means is that you still have to purchase an extra 1/2-yard to add the optional border. Sorry, ladies, my mistake!
First you will make a "quilt-sandwich". Layer your backing fabric, your batting and your quilt-top and then smooth the three layers:

Trim your batting and your backing about 1-inch bigger than your quilt-top:
Using small safety-pins, tack the three layers together:
Now you are ready to "quilt" your quilt. There are three methods of quilting and they are: tying, machine-quilting and hand-quilting. Tying is very quick and easy and is perfect for a baby quilt or a casual-use quilt. My personal favorite is hand-quilting because I enjoy doing it and it gives an old-fashioned feel to the quilt. It is, however, the most time-consuming choice. Machine-quilting creates a similar look as hand-quilting but it is quicker. )You will need a "walking-foot" for your sewing machine to machine-quilt.)
I have discovered that this is the hardest step to convey over the internet. I have found a few great websites that discuss these methods (except for tying) and to begin with, I think this is the best way to show you how to proceed. The hand-quilting tutorial is GREAT! The woman who created it did a great job of adding pictures and decribing how to do it step-by-step. For the sake of clarity, I also added an extra hand-quilting link.
Machine-quilting is a different story. Since I just did it for the first time and my results were less than perfect, all I can do is to direct you to the informnation that I found helpful. I think this is a process that needs to be practiced before it can be perfected. The first few squares I did were fairly bad, but they soon got better, until by the end of my quilt they looked nice. SO for me, this is a sort of practice quilt. I will make a couple of comments about machine-quilting:
--Use a walking-foot and practice with it before sewing on top of your quilt--this will help you get the "feel" of using the foot
--If this is the first time using a walking-foot, pick a simple quilt design--save the complicated ones for another time!
--Even if the results are less than perfect, finish your quilt and chalk it up to "practice". We all have to start somewhere, right?
--Whatever method you choose, make sure that you stitch or tie no more than 6-8 inches apart. This will keep your batting in place and keep it from tearing.
--I have included some pictures at the bottom of the page to show where you can stitch on your quilt.
I found a great tutorial on hand-quilting complete with drawings. Be aware that in the tutorial, she uses the word "wadding" for "batting". For more information click here.
Here is the tutorial on machine-quilting that I used. You have to go about half-way down the page to find the machine-quilting section. Look for the rolled-up quilt! I followed her directions for quilting my own quilt. For more information click here.
Another method is tying. This is the easiest method for your quilt. Here is how you do it (In the pictures I used red thread so you would be able to see what I am doing, but you would want to choose a color that matches your quilt):
Thread a needle with 3 strands of embroidery floss and make a small stitch through your fabric, making sure to grab all three layers (quilt top, batting and backing):
Cut the thread and tie a knot:
Trim to the desired length:

If you choose to tie your quilt, I would suggest tying the center of each pinwheel. You could add more ties in you want to, but don't do less than one tie per block.
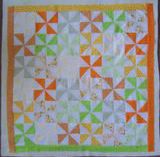
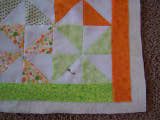
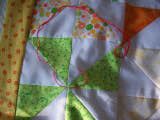
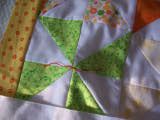
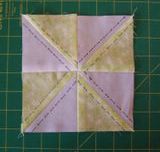
Here are some pictures to give you an idea of where to quilt on your quilt-top (feel free to be creative):
Shadow quilting (you could quilt the pinwheel fabrics too):
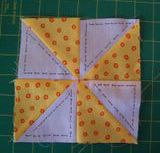
Stitch in the ditch--the quilting is in the seams. (This block did not make it into my quilt because it is so crooked!):

I am not sure what this is called so I will call it Option #3:
Please let me know how you are coming along!
Enjoy!


|